
Add a Title


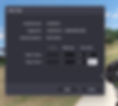
Use the video edit and playback tools at the bottom of the screen. Your yellow playhead indicates where the video will start playing from. You can move this anywhere, just click on it and drag to where you want to start.

Find the spot you want to start on, click Set Start Position.
Current time always reflects where the playhead is. See above picture.

You have selected your start point, now move the playhead or use the playback buttons to find your end point and click Set Stop Position to set your stop point.

Clips can be saved just like annotations. Hit Ctrl + S or click the Save Clip icon. This creates and saves the clip under the main video.

Want to redo it? No problem!
Adjust your numbers, move it around, and hit Update Clip.
You can also click the Play Clip button in the Viewer to preview your newly created clip.


For the second way to do things, the Update Clip will help you fine tune the start and stop.
Right-click on your video (not the folder) and select Add Clips...
An editor window then opens and allows you to enter the start and stop points you would like to save as separate clips. Click Add to create the new clip, repeat as many times as necessary, then click Close when you are finished creating the clips.
Want to redo it? No problem!
Adjust your numbers, move it around, and hit Update Clip.


Click on your recently added clip to load it into the viewer.
Use the arrow keys on your computer to move the video forward frame by frame. Notice, my current time is what I want to save, so I hit the Set Start Position button to change my start.
Now I hit the Update Clip button to save it and my clip starts where I want it to start. You can repeat as necessary for both the start and stop.
Having problems with the video file? Right-click and select Optimize Video or Audio.
Step-by-step Instructions
About Multimedia Files or Audiovisuals
To edit multimedia within OnCue, you will need to create clips. You can do these two ways. Our Audiovisual section is for non-synced videos (surveillance, animations for example) and are added to OnCue like they are in a folder. This way you can have multiple video files in one folder. You will see, main folder, then your video, and when you create clips, they will appear under that.
OnCue clips of an audiovisual are the equivalent of an annotation to a document. Nothing about the original is changed. Once created, you can even reorder clips underneath the added file and renumber the IDs.

Video Editing & Playback Tools
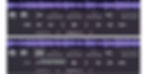
Use the video edit and playback tools at the bottom of the screen. Your yellow playhead indicates where the video will start playing from. You can move this anywhere, just click on it and drag to where you want to start.

 | Find the spot you want to start on, click Set Start Position. Current time always reflects where the playhead is. See above picture. |
 | You have selected your start point, now move the playhead or use the playback buttons to find your end point and click Set Stop Position to set your stop point. |
CTRL + J | Jump to a specific timecode in the video. Enter the timecode in HH:MM:SS format.  |

 | Clips can be saved just like annotations. Hit Ctrl + S or click the Save Clip icon. This creates and saves the clip under the main video. |

 | Want to redo it? No Problem! Adjust your numbers, move it around, and hit Update Clip. |
You can also click the Play Clip button in the Viewer to preview your newly created clip.

Right-Click -> Add Clips...
For the second way to do things, the Update Clip will help you fine tune the start and stop.
Right-click on your video (not the folder) and select Add Clips...

An editor window then opens and allows you to enter the start and stop points you would like to save as separate clips. Click Add to create the new clip, repeat as many times as necessary, then click Close when you are finished creating the clips.
Edit Existing Clips
Click on your recently added clip to load it into the viewer.

Use the arrow keys on your computer to move the video forward frame by frame. Notice, my current time is what I want to save, so I hit the Set Start Position button to change my start.
Now I hit the Update Clip button to save it and my clip starts where I want it to start. You can repeat as necessary for both the start and stop.


Annotating AV Clips
When you have an AV clip open in the Viewer, the toolbar will display all available tools as if you were annotating a document. Keep in mind that all annotations (markups) are overlays on the screen, so they do not move when the video moves. Zooming and rotation remain in effect until you change it back. It works just like the documents work.
Below is the toolbar for AV clips. Each tool is explained in detail in in this article.

You MUST save a zoomed in or annotated portion as a clip if you it to play that way when published to Presentation. Otherwise, you can zoom and annotate on the fly while presenting.
Problems With the Video?
Having problems with the video file? Right-click and select Optimize Video or Audio.